Absolutely everyone I know uses dried food and spices in some way. Think about it: Who doesn’t have garlic or onion powder, parsley or oregano in their spice cupboards? How about pasta or rice? Dehydrating, or drying if you prefer, is another one of those ancient food preservation methods because it removes one of the key elements that makes food spoil and rot: moisture. In my early days of learning all I could about long term food preservation that I could do myself, dehydrating was one of those activities that wasn’t as scary as pressure canning, and seemed much more simple than smoking meats and cheeses. It’s kind of the ‘gateway’ to food preservation. In this article, we will unravel the mystery about dehydrating (or drying, it is the same thing) by first looking at what you are really doing when you dehydrate food (the science of it), to what you need to have a greater chance of success as a newbie, and then I will touch on a few fun things I do to help get the imagination flowing.
The Science of Dehydrating Food
Our ancestors learned thousands of years ago about the preserving qualities of dried food. I can imagine some berries were left out in the open and dehydrated in the sun and warmth. Imagine the leap forward humanity took when it learned how to preserve food to last into the cold months! The science behind it is very simple: by removing the moisture from the food, you are taking away the environment bacteria needs to grow and spread in. If you do not manage to get the food completely dry, you will learn your lesson quickly when a certain batch goes bad faster than others. It really is that simple!
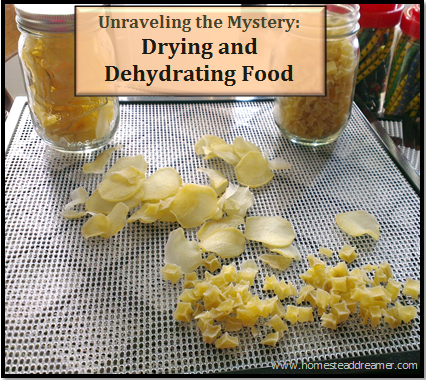
Jerky, fruit leather, sliced potatoes for making an au gratin; They all employ the same ideas and general methods. Some may argue that dehydrating and drying are not the same and in one aspect they may be correct. The purists would define “dehydrating” as when you use a machine that produces heat and forced air, and “drying” when you hang something to air dry (which is usually inside where it is warm and the air moves with the people in it). For our purposes here, they mean the same thing and how you choose to dehydrate your food is up to you. Personally, I prefer to use my dehydrator but I have simply hung bundles of herbs to dry before, too. Certain things, such as jerky, require heat to cook and remove any bacteria while also removing moisture. Making fruit leather also needs some heat, but at a lower temperature. Some vegetables, like potatoes, need to be blanched first. See below for information on blanching.
The Equipment and Process
There is no ‘wrong’ way to dehydrate your food, unless it allows for the growth of bacteria and is not a consistent temperature for the time needed to fully remove the moisture. There are several ways people go about it and I have seen a few…interesting ones (but they worked!).
Modern Dehydrator. We personally use the monster of home dehydrators, the Excalibur Deluxe 9 Tray model. It was expensive and took us a couple of months to save up for but it has been worth.every.penny. Another dehydrator that has good reviews is the Necco Snackmaster model that is more affordable while still getting a quality item. I have seen reviews that say you need to rotate trays to make sure things dry evenly. In my opinion, that is not really a big deal considering when using either of these machines you are essentially putting food into them and walking away for several hours. Thankfully, we in this modern world do not have to hold guard duty over our drying food as there are no predators that may sniff it out and come looking for a tasty snack. Well, I suppose the two legged variety is a potential threat. 😉 It is a low maintenance way of food preservation and that is just fine with me!
Using the Oven. Even though it takes more monitoring than a modern dehydrator, you can always just use your oven. There are some minor challenges that you need to overcome to ensure success. For example, it depends on what you are wanting to dehydrate. Most ovens do not get down to the low temps that dehydrating food requires. The highest temperature setting on mine is 155 degrees F. That is the setting for jerky which allows it to get hot enough to kill bacteria and slowly dry it out to prevent any new bacteria from growing (plus, it is absolutely amazing. I have ruined myself forever on any store bought jerky!). Dehydrating herbs is even lower at only 95 degrees F. One way to make it work is to leave the oven door open. I have heard of some people who turn their oven on to a slightly higher temperature than needed, put the food in there and then turn it off. They monitor it by watching the thermometer hanging from a rack and when the temp drops down too low, they repeat the process until done. Another thing about using the oven is making sure there is airflow. Using a cooling rack is a good way to help with this, as is using some tinfoil with a pattern of holes. Finally, you absolutely must rotate the food around to ensure an even drying.
Solar Ovens. I keep seeing articles and some videos about people using solar ovens for dehydrating things like berries, celery, and tomato skins. I would love to be able to try one out! At first, I didn’t think we would be able to use one here because 1) We don’t get much sunshine except in the winter (Define Irony, haha!) and 2) Because the best sun is in the winter, it won’t heat up enough because it is cold outside. I suppose there is also the concern of the local pack of pups in the neighborhood sniffing it out but that could be worked around. Then I saw a video (I wish I could find it again!) about a person in somewhere like Michigan or Minnesota who was using theirs in the dead of winter. Not only that, the thing was set in the snow and worked! I am hopeful that the opportunity will come along for me to try it out someday and would love to hear from anyone who has experience with them.
Hang Dry. Most people have seen the little old lady who has bundles of herbs hanging in the rafters of her old house on TV or heard about it in a story. It is a tried and true method of preserving medicinal herbs and spices for the long, cold months of winter. The key here is the warmth and air movement from being hung in the kitchen or over the wood stove. There is a risk of the air getting too moist and inadvertently rehydrating your stock which can lead to mold and spoilage. Generally speaking, it is best to store your dried and dehydrated items in a vapor sealed container to ensure it will last.
Less Conventional Methods. Again, I tried to find the video from An American Homestead where he used his car – that’s right, his car, to dry out hot peppers. They are in the Ozark Mountains and I know from personal experience that it gets hot there. Unholy hot. This Alaskan girl does not do well in that kind of heat. Anyway, back to the peppers. I applauded their ingenuity and use of what was available to them. Not only did it work, it kept bugs and animals out of their harvest. If I recall correctly, their vehicle smelled especially spicy for months! I wonder if it was worth the trade off haha! While I wouldn’t recommend using your vehicle to dehydrate food in personally, it is a good reminder to think outside the box.
Blanching Food. Most vegetables need to be blanched before you dehydrate them to help break down enzymes that can cause quality to drop much faster. The point of dehydrating your food is so you can use it later so it is in your best interest to try and keep as high a quality and as much of the nutrients as possible. Potatoes in particular need to be put into boiling water for a minute or two and then placed in a bowl of ice water to stop the cooking process. This is called blanching. Simply get a pot of water to a full boil, drop the veggies in for a few minutes and then into the ice water. There are different times for each vegetable, though not all need it. For a good list of blanching times for different vegetables and more on blanching in general, check out this article from Aboutfood.com.
Dehydrating Plant Matter*
When I say “plant matter” I mean just that: all plants. Berries, leaves, stems, vegetables, fruits, and nuts. It can all be dehydrated and stored. There are certain steps for each one but essentially you just toss them into the heat and air and walk away to let them do their thing. Times vary with herbs and spices being the quickest to dry. Certain fruits and vegetables may take considerably longer, depending on their water content.
 The Short and Skinny of Dehydrating Plant Matter
Fruits: Remove the skins in most cases. Cube, slice, or shred as desired. Lay out evenly with plenty of air around the pieces. Consult your machine’s instructions or research the recommended length of time and temperature setting. Always check halfway through to make sure things are drying evenly and rotate as needed. If you choose to dehydrate things like pineapple chunks, watermelon, and orange slices, please note these fruits have a high water content and can (and likely will) cause a mess! A friend learned this one the hard way. It didn’t stop her from doing it (her husband eats it like candy) but now she knows how to keep the mess down.
Vegetables: Do some research beforehand to determine whether or not you should remove skins and/or blanch before dehydrating. Slice or cube into small pieces. Consult your machine’s instructions or research the recommended length of time and temperature setting. Always check halfway through to make sure things are drying evenly and rotate as needed.
Berries: Small berries like huckleberries or blueberries can simply be put in a single layer on a sheet and put in the dehydrator. Some sites suggest you take a needle and prick each one first but I have never had an issue with not taking that step. Larger berries such as strawberries should be slices or cubed. Lower temperatures.
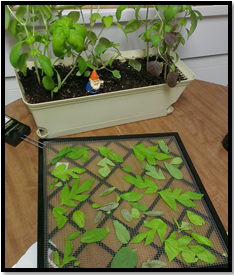
Leaves and Stems: These are done at the lowest temperatures and for the shortest time. Usually 2-4 hours. Make sure they are laid out in a single layer with air all around them. NOTE: If using a modern dehydrator, you may want to put a plastic sheet over the top to keep the leaves from flying all over the place. Personal experience!
Nuts: Dehydrating nuts can be done in or out of shell, plain or seasoned. Whole nuts, especially in shell, take longer; up to 16 hours in some cases! If you are dehydrating nutmeats, it will take less time but you may need to rotate it. Moderate temperatures (105 – 115 degrees F).
Dehydrating Meats and Proteins*
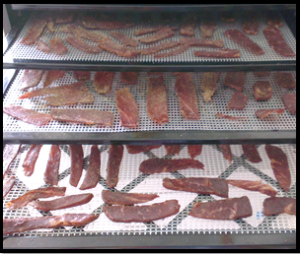
Dehydrating meat is a whole different ball of wax and extra care must be taken to ensure no one gets sick and you don’t end up tossing out your hard work and money. Meat needs to be raised up to a high enough temperature to kill off bacteria while removing the moisture for it to grow in. Generally speaking, meat is cut thin. The thicker it is, the longer it takes and the higher the risk of it not fully dehydrating. Nuts are a protein explained above but there are other people who dehydrate eggs and milk, too. I have not personally tried this and if you decide to head down that path, you do so at your own risk. I admit I am curious, though.
 The Short and Skinny of Dehydrating Meats and Proteins
Rule of Thumb: The thicker the food, the longer it takes. While this is true for all dehydrating, it is especially important with meat. Red meat has a different set of time and temperatures than fish does. Make sure to do your research and follow the recommended rules from the USDA. I will keep this one short and sweet as it could be a whole article itself.
The Fun Stuff
Now for the fun stuff! I have dehydrated many herbs and spices and saved a good amount of money by growing and preserving my own! I have also dehydrated up carrots, onions, and potatoes to use in making my own stew starters (which are incredibly delicious when rehydrated with vegetable stock!). I have made up over a hundred pounds of jerky (pre-drying weight) and made up bags of dried fruit slices to take with us on hikes and camping. By dehydrating your surplus from the garden, you are ensuring that nothing goes to waste and creating a shelf stable food. It requires no refrigeration and that helps save money, too! Also, watch your local stores for sales on fruits and vegetables. You can also check with the produce department to see if they have any bruised, ugly, or overripe food they will sell to you cheaply. Some places will not sell it to you unless you intend to feed it to your animals such as rabbits and chickens so be sure to check the policies first.
I hope this helps to move the curtain aside and show how easy it is to take charge of your own food processing without being stuck in the kitchen all the time! Dehydrating food is easy, economical, and a great skill to have!


Dehydrating foods has really evolved over the past several years. There are so many different process that you mention like the modern dehydrator, over, solar ovens, etc. All these are great for snacks and storing foods. I know me personally the deer hunt is coming up and the modern dehydrator is a great way for me to make jerky. Thanks for posting this great article, I will surely use some of these tips!
Started Dehydrating Food (mostly fruits) because we had a chance to get some free fruit in abundance. It has been great for easy snacks for the kids. Would love to try more stuff this next year.
Thanks for the great article.
That is the perfect way to preserve those surprise boosts! You can make fruit leather from apple peelings and stuff, too. I have dehydrated herbs, fruit, made jerky, dehydrated potato slices and cubes, onions… we really love ours. Thanks for the comment!