We have been growing food in cold frames for two years now and honestly, I couldn’t imagine not using cold frames to extend the growing season and protect the plants from various pests and incredible amounts of rain (not to mention light frosts). I have had many requests to write an article about this specific topic but wanted to get another year under my belt before writing on it. Some people use cold frames to start sprouts in while others, like myself, use them to grow veggies in from seed/sprout to harvest. Here is an account of what we have grown and the lessons learned about cold frame gardening.
A cold frame is defined by Merriam-Webster as, “A small wooden or metal frame covered with glass or plastic that is used for growing and protecting plants in cold weather.” (source) There are some who use concrete or cinder blocks for the base of the frame as well. In my opinion, a cold frame is anything that protects seedlings and plants in a raised bed (or box) against the weather and pests. Others call it a ‘raised bed with a cover.” No matter what term you use, the goal is to protect the plants and extend the growing season. The raised bed stays warmer, longer and the plastic or glass cover helps to harness and trap the warmth that plants need to grow and build strong root systems. On average, our cold frames are 10 to 15 degrees (F) warmer than the outside air and this makes a big difference not only in the extension of our season, but also in what kind of foods we can grow.
Cold frame gardening extends your growing season and protects plants from pests and weather
We are in USDA zone 7b which means the coldest average temperatures are between 5 and 10 degrees. The reality is that it rarely gets that cold here. When we start getting into single digits, we are breaking temp records. Also, there are only a couple months where it even has the potential to get that cold. Yes, for most people that is bone-chilling cold but when it comes to gardening, you can work with it by cold frame gardening. As stated above, the temperatures inside the cold frames will be warmer by about 10-15 degrees, depending on how much direct light it gets. Obviously, cold frames that are in the shade will be cooler as there is no sunlight to be harnessed for warmth. In our area, frosts can happen anytime from September into May though we have a very mild climate. Because of this long variance, cold frames are (in my opinion) essential to getting a jump start on your growing season. Starting frost hardy plants such as peas and onions, for example, is perfect use for a cold frame. Simply plant your seeds and let nature work her magic. Because cold frames are covered with glass or plastic, warmth is trapped inside and keeps the soil temperature higher which fosters growth. It lets you start earlier!
 On the flip side of that is the ability to plant later in the year and still harvest long after everyone else’s garden is left for the winter. Most people would gasp in horror at the idea of planting anything in late July or August. How about early September? Because of how they are built, I can plant peas, beets, lettuce and greens, and even green beans in August and be able to harvest into October. As with anything, there are exceptions. If we get a sudden boost of cold air that keeps us hovering around 20 degrees (F) for a few days, that pretty much spells doom for whatever is left because we do not use any sort of heat lamps. We may do something to heat the soil when we buy property and have a more permanent set up but for now, the ability to grow beyond what most people do around here is satisfying enough.
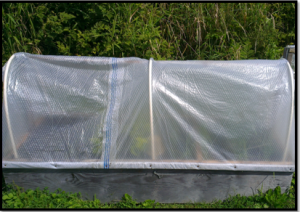
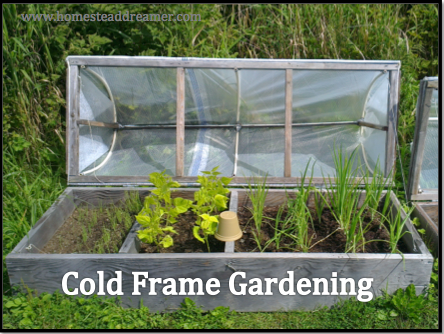
Cold frames are incredibly simple to build but can be as elaborate as you want. Our basic cold frame is built with a 2″ x 12″ x 20′ piece of wood that is cut to end up with 2 – 8 foot sections and 2 – 2 foot sections. Then you simply hammer them together to make the base. I like to put pieces of wood inside as well to create different sections within a cold frame though it is not strictly necessary. For the lids, we cut a 2 x 4 in the same dimensions as the base. We use 1/2″ PVC pipe for the quonset style framing that the plastic is then put over. Last year, the lids were separate and I would have to remove and replace them daily. This year, we added hinges to fix the lids to the base and ran hemp twine on hooks so that when we open them up, the lids do not simply flop backward. Due to the high winds we can get in our location, it would be better to have them slam closed than rumble around loosely and potentially damaging the hinges. We also added hook-in-eye latches to help keep them shut at night and high wind storms. In all, the cold frames we built (not including dirt) cost us about $50-$60 to build (in the lower 48, it would be 30-50% less for materials).
We place plastic or garden mesh down to help keep weeds from growing and place the frame on top. We put a single layer of larger drainage rock on top of the plastic and then fill with soil, manure, perlite, and some sand, depending. I have learned that it is 100% acceptable to fill the frame all the way to the brim because as you water, the soil will compact down 3-5 inches. We do have ones that are deeper specifically for carrots and onions but this will serve for most crops. Once the soil is in place, we will attach the quonset style lid over the top and install the twine and latch and it is ready to go! Having the lids attached has saved some back pain and sanity, to be sure. It makes it so easy to fully open them for the sunny days and just prop open for those particularly rainy days. Watering cold frames is easier in many ways as well since you can just let nature handle it for you and then close the lid if it rains more than you needed to water. We have saved considerable time and water by allowing nature to take care of the outside and save the water for the greenhouse plants instead.
Cold frame gardening cuts down on weeds!
We have successfully grown 3 lettuce varieties, mustard greens, peas (short vine variety), green beans, carrots, garlic, green onions, cucumbers, white onions, and red onions in our cold frames over the last two years. There are very few plants that would not thrive by using cold frame gardening, at least in our climate. If we lived in the South where the lowest temps are 30-35, we would use the cold frames for “winter” gardening. Another serious plus: The amount of weeds that end up needing to be pulled is lessened considerably because you have essentially created a type of controlled area that is not susceptible to having as many unwanted seeds blowing in. Pests are also controlled more easily.


I have successfully used cold frames for many years to grow cool weather crops such as lettuce, spinach, radishes, and carrots. I have not yet used one to start seedlings for the main garden but intend to try that this year. I find the most difficult part of using them is temperature control. A cold frame will heat up to killing temps in a very short time but also can cool down to freezing temps just as fast. I find that adding thermal mass, such as quart or half gallon jugs of water will moderate the extremes on most days.
Thank you for your article. Every year here in NC I grow greens but theose little hopping bugs eat holes in them and a lot is wasted. We replaced our storm door last year that has a full length screen. I have cinder blocks and I am going out soon to start building my cold frame. I will put the glass on to start but leave the screen on all summer to protect my greens. Then a fall garden and glass back on.
Excellent idea to keep the glass. We had glass to start but it didn’t last long. One broke and the other one just didn’t work for what we were growing (carrots). Our solution was the plastic over PVC pipe you saw. You are very welcome for the article and THANK YOU for the comment!